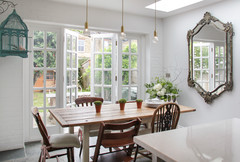
5 Inspiring Ways to Think Creatively About a Project Challenge
Take a look at these renovation challenges to see how smart thinking came up with a solution

It goes without saying that renovations aren’t always plain sailing, and many throw up issues that require some creative decisions. These five projects each presented a different challenge, but the professionals devised ways to solve them. Read on to find inspiration for your future projects.
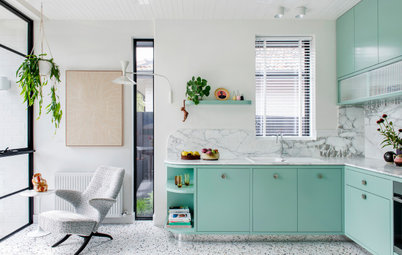
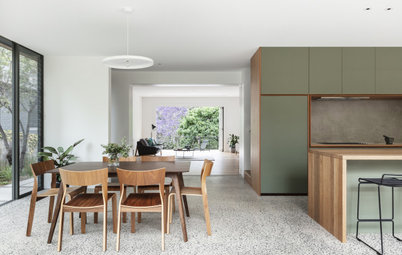
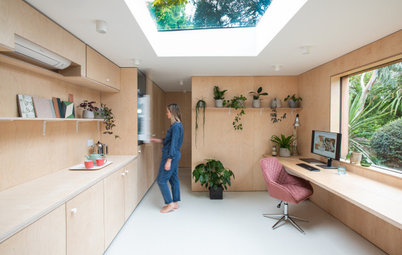
Challenge 2: Finding the space for a super-discreet extractor and hob
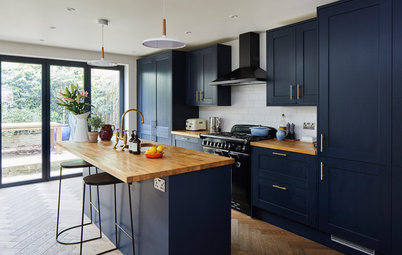
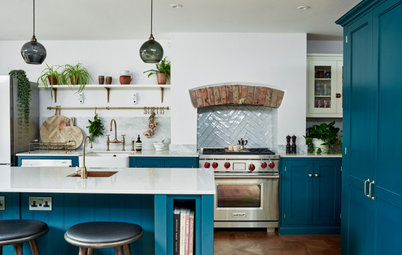
The owners of this kitchen wanted to look out of the window while cooking, which meant an overhead extractor above the hob was off the cards. A downdraft extractor was the obvious choice, but there were a couple of issues. Firstly, it would require a large motor to be installed beneath the worktop. It also needed a lot of space around it, but a deep worktop would have made it harder to reach the back and been expensive.
The solution: Charlie Draper of Sustainable Kitchens sourced a hob that was very slim, but at the same time large enough for the owners’ needs. She also made use of the shallow area in front of the motor below by designing neat storage for kitchen cloths and spices.
Discover more about about this elegant kitchen with discreet storage.
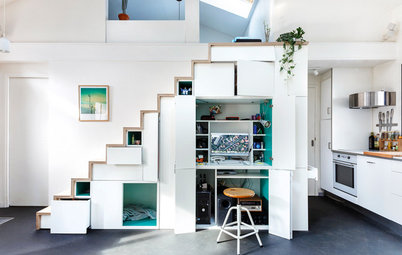
Challenge 3: Positioning a bed in front of a chimney breast
The location of the bed is usually limited to where there’s a clear wall surface behind the headboard. However, in this tiny bedroom, designed by Phil Thomas of Albert’s House, it made sense to use the flat wall for storage cupboards. This meant the bed had to be positioned in front of the chimney breast.
Solution: To prevent the bed from jutting out into the alcoves, Phil used clever joinery to turn these voids into a feature. The team created false half walls either side of the chimney to fill out the space. Hinged shelves on top open up to provide access to the storage within to maximise the space.
See the rest of this tiny cottage with a space-enhancing update.
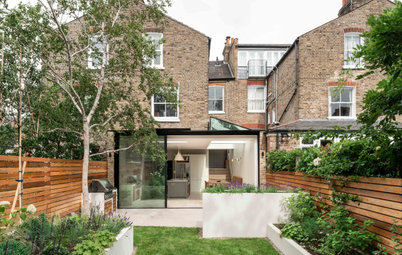
Challenge 4: Maintaining light in a basement
The original extension on this house, belonging to architect Angus Eitel of fiftypointeight Architecture + Interiors, protruded quite a way into the garden. Angus decided to reduce the footprint of the extension, which allowed him to add a full-width addition instead. A challenge was presented by the basement, which originally had a lightwell to the outside. “The big worry about a full-width extension was: ‘How do we still get light into the basement?’,” Angus says.
The original extension on this house, belonging to architect Angus Eitel of fiftypointeight Architecture + Interiors, protruded quite a way into the garden. Angus decided to reduce the footprint of the extension, which allowed him to add a full-width addition instead. A challenge was presented by the basement, which originally had a lightwell to the outside. “The big worry about a full-width extension was: ‘How do we still get light into the basement?’,” Angus says.
The solution: The team resolved the issue by stacking a rooflight and a glass panel. This allows a vertical shaft of light to travel from the first floor level down to the basement. “The quality of light is surprisingly good for a [basement] space with no windows,” Angus says. “The glass also creates a nice divide between the old and new parts of the building and the transition between the two styles.”
Find more tips from this smart kitchen extension.
Find more tips from this smart kitchen extension.
Challenge 5: Turning a two-bedroom flat into a family home
The owners of this 85 sq m, two-bedroom flat needed more space for their family of four, but they really wanted to stay in their home. It made sense to extend the property, but Tim O’Callaghan of nimtim Architects was presented with limited options.
A full-width extension wasn’t possible, largely because there were more restrictions around the boundaries on one side than the other. A basement conversion had also been given approval, but Tim found it wasn’t feasible due to costs and the position of a main sewer beneath the building.
The solution: “In the end, we didn’t really add that much floor space,” Tim says, “we just elongated it and completely reconfigured the internal layout.” He designed an L-shaped extension to accommodate two new bedrooms. He also relocated a bathroom that was at the back of the flat to a windowless room that was being used as a second bedroom.
The doors to the children’s new rooms are located along a narrow corridor, which could have made the area feel slightly squashed. However, Tim installed generous glazing along the external wall and above, which makes the area appear much more spacious.
Be inspired by this petite flat made fit for a family of four.
Tell us…
What challenges have you solved for clients in the past? Share your experiences and photos in the Comments.

Sponsored
Reload the page to not see this specific ad anymore
This elegant room used to be a bedroom, so when Stephen Nash of ALL & NXTHING decided to turn it into a bathroom, he needed to install plumbing. The catch? The home is a Grade II-listed 1790s townhouse, which prevented the team from running pipes through the underfloor joists. “We could run the pipes from the front to the back of the house, but we couldn’t cut through the joists to run them horizontally,” Stephen says, “so we had to think of another plan.”
The solution: Stephen came up with the idea of running the pipes along the wall and covering them with panelling. These soft green panels, which align with the windowsill, were made by his carpenter and add a beautiful feature to the room, as well as hiding the pipework.
Get more ideas from this master bedroom and en suite.