How to Invite and Collaborate with Subcontractors
If you are working with subcontractors on some of your projects, Houzz Pro makes it easy to collaborate, communicate, and ensure you're on the same page.
In this article, we will go over how to add a subcontractor, edit subcontractor information, share information, and better understand the subcontractor view of Houzz Pro.
Add a Subcontractor
There are three ways to add a subcontractor — you can add them to your subcontractor list, add them to an individual project, or add within tasks and/or schedule.
From Subcontractor List
The easiest way to add a subcontractor is through your subcontractor list within your Company Settings.
When adding a subcontractor this way, you can choose to invite them to a specific project, or you can just add in their information without adding them to a project. This is a great option if you would like to document subcontractors you've worked with in the past and/or want to work with in the future.
When you add a subcontractor this way, the subcontractor will not receive an email unless they are invited to collaborate on a specific project.
To start:
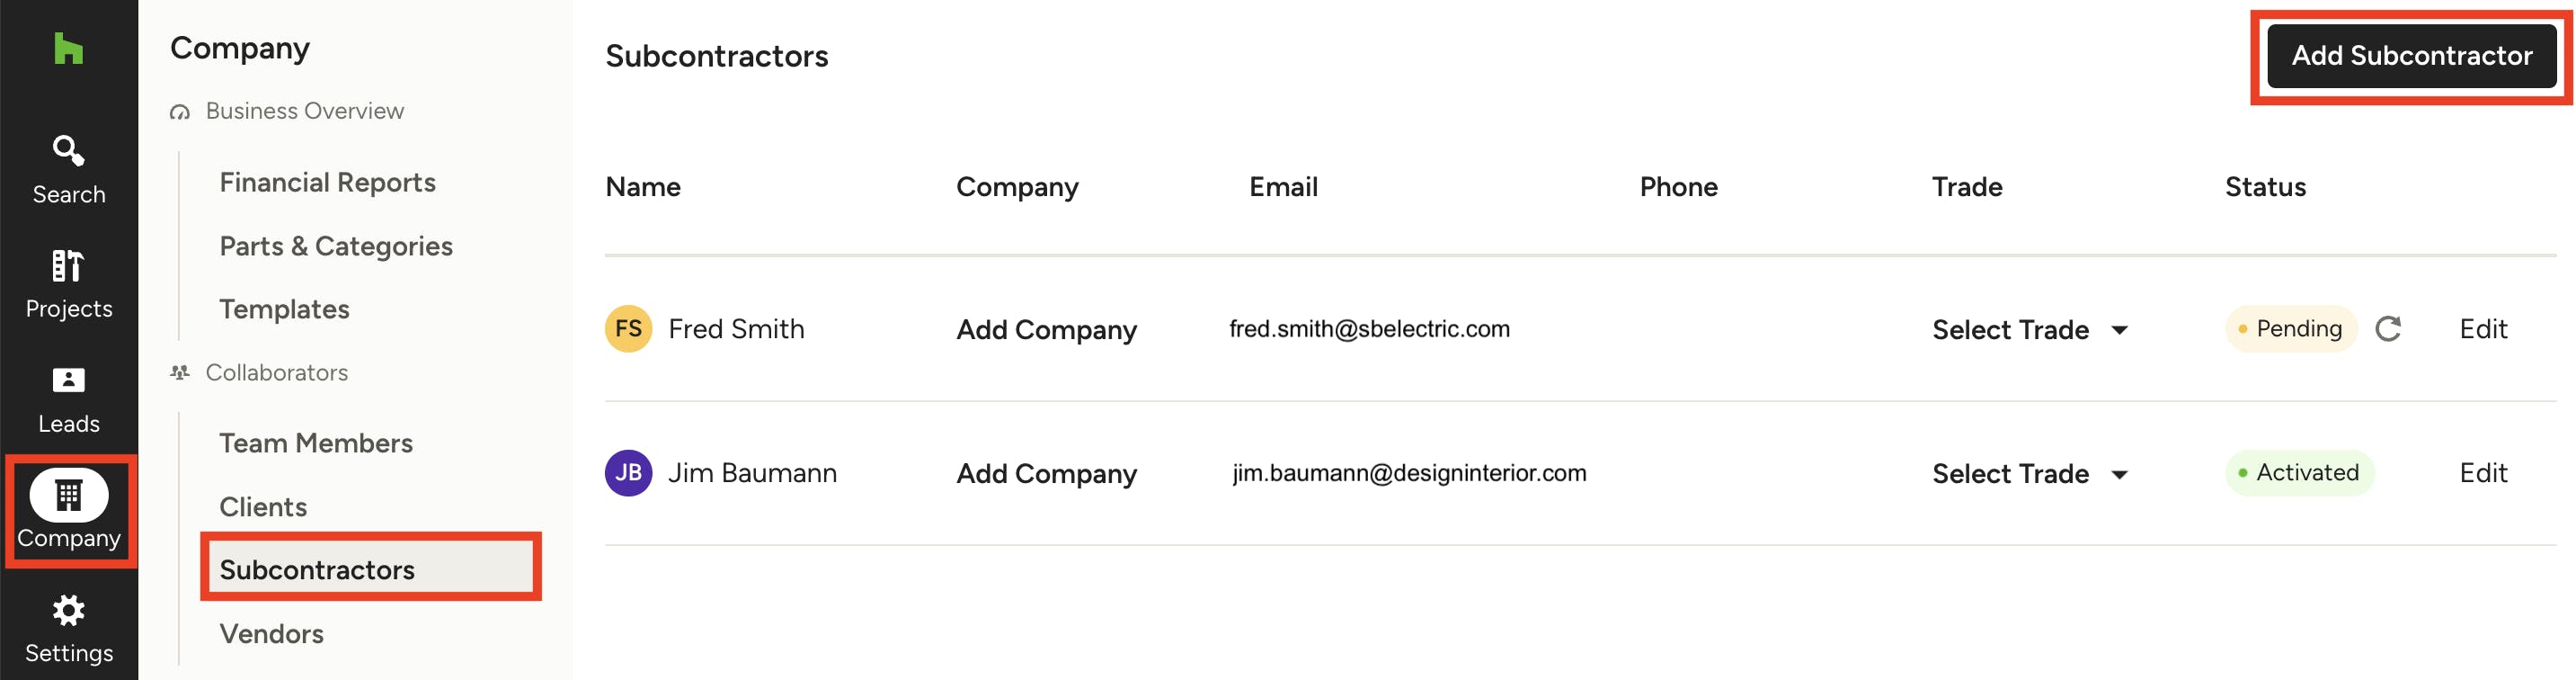
1. Select the Company icon in the left navigation.
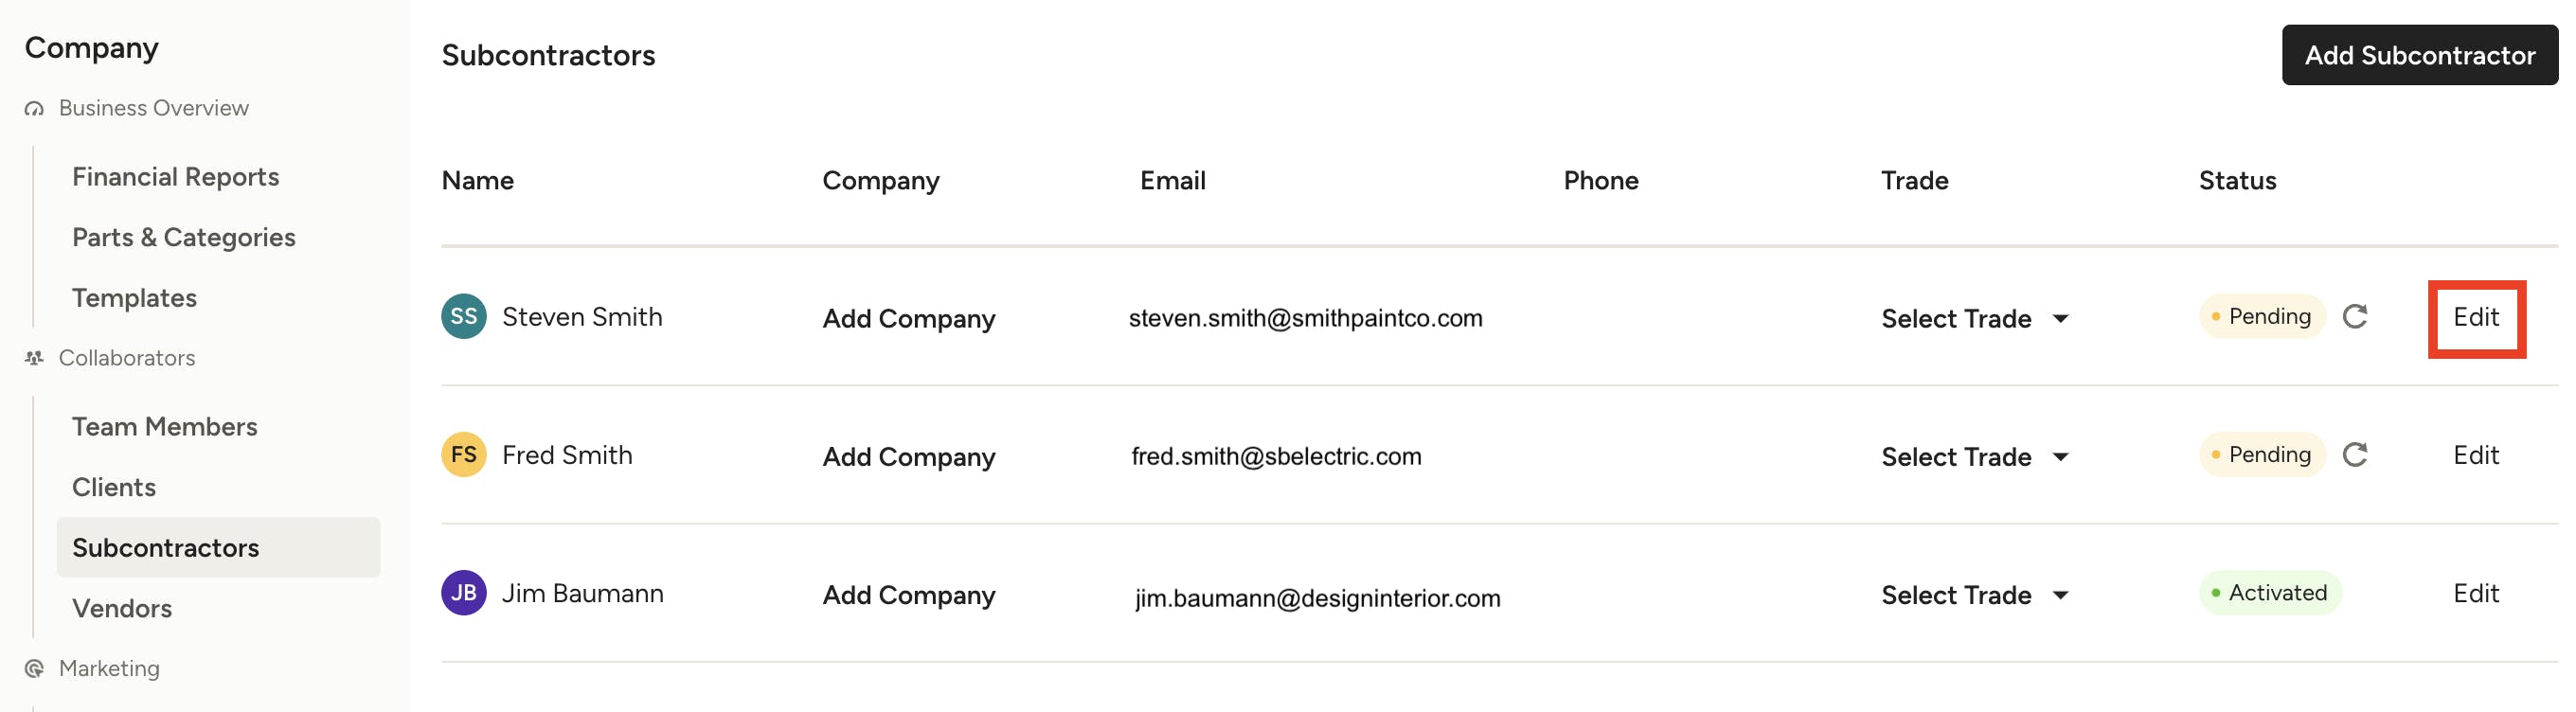
2. Select Subcontractors from the left menu. This screen will list all your existing subcontractors, including those who are active or pending. To add a new subcontractor, click the Add Subcontractor button at the top.
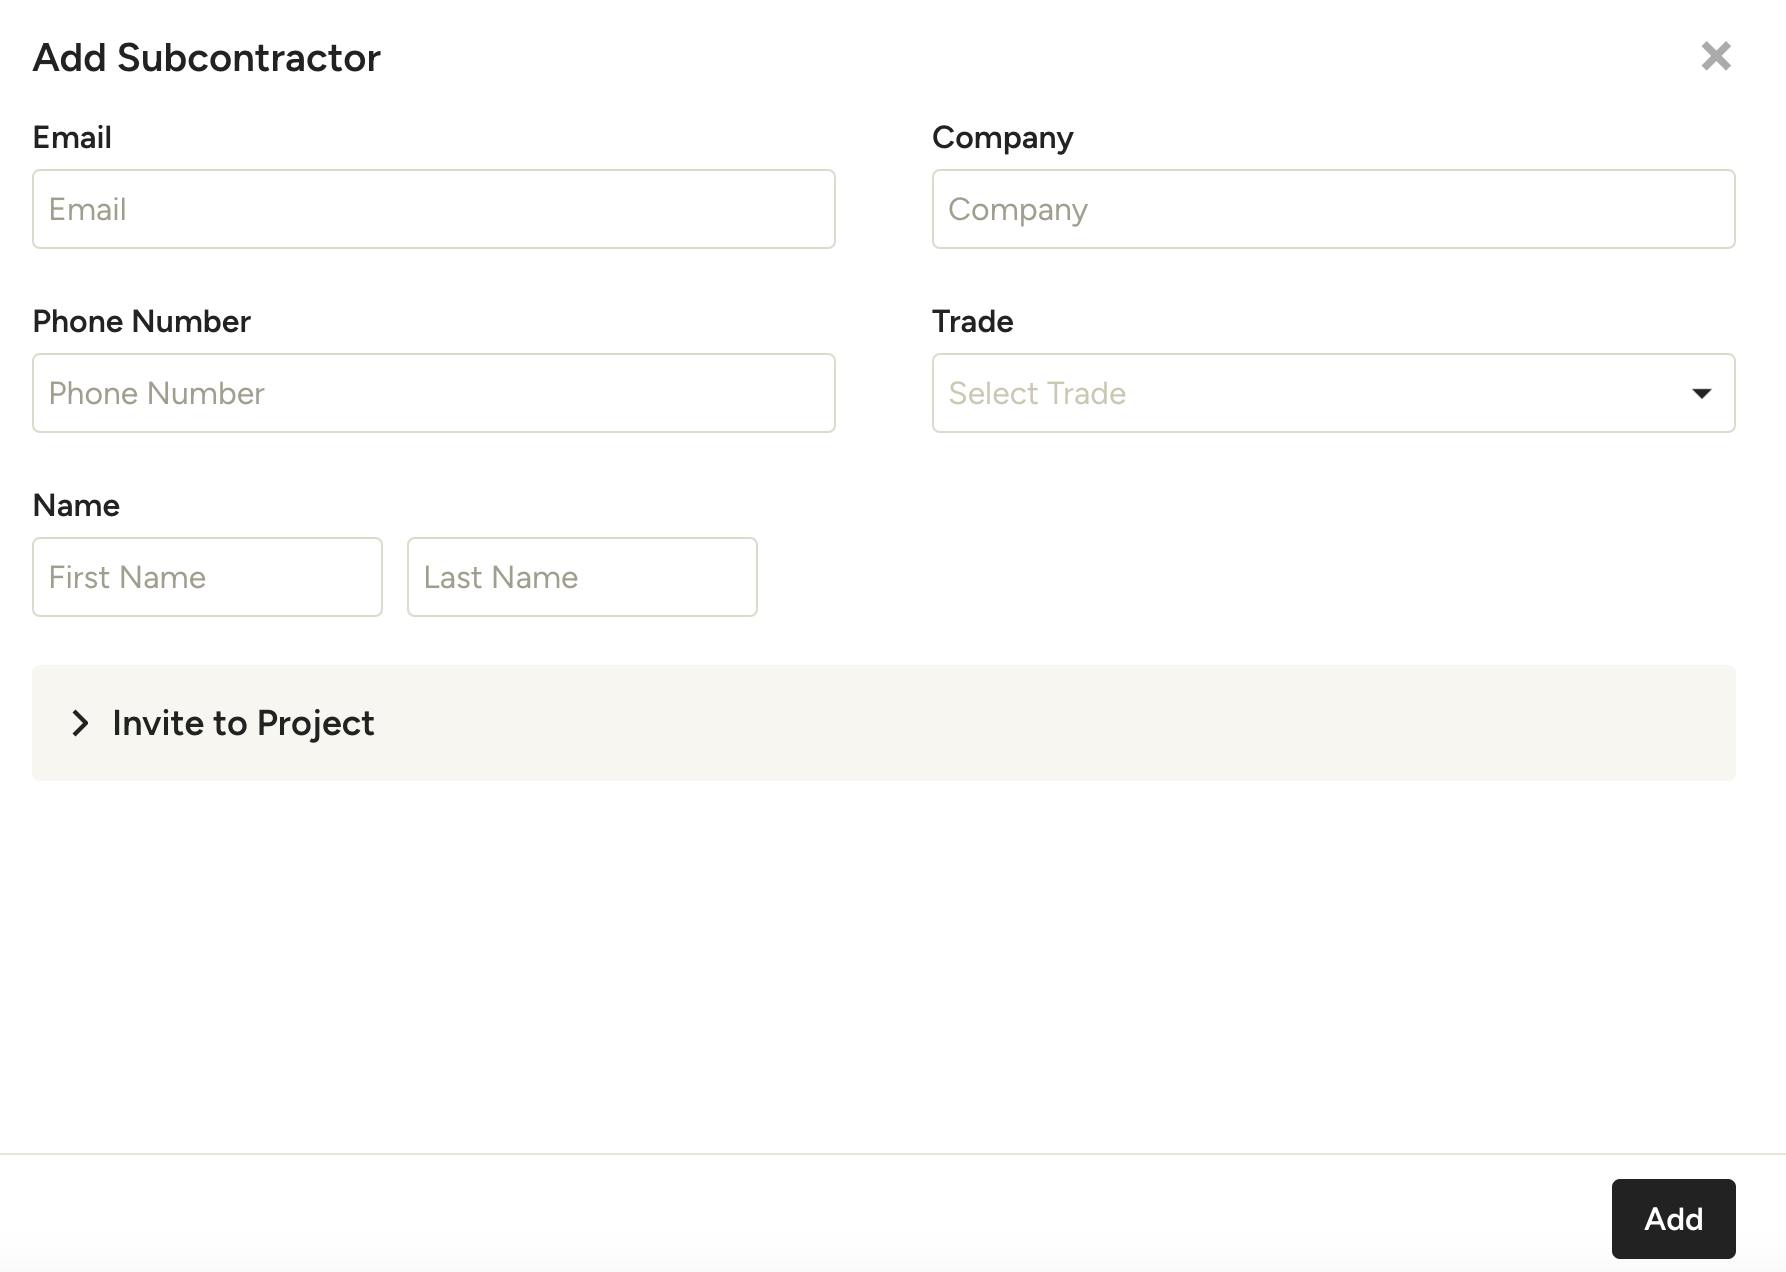
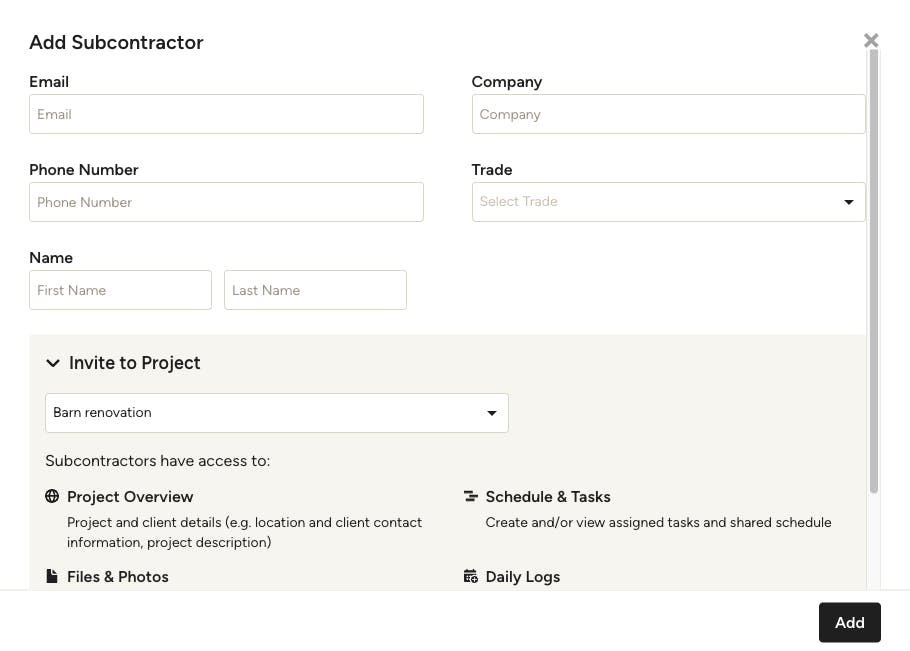
3. A screen will appear where you can fill out the subcontractor's information, including name, email, phone number, company name and trade.
If you don't want to invite the subcontractor to a project, skip the Invite to Project section and just click the Add button at the bottom. The subcontractor will now be added to your subcontractor list, but no invitation will be sent.
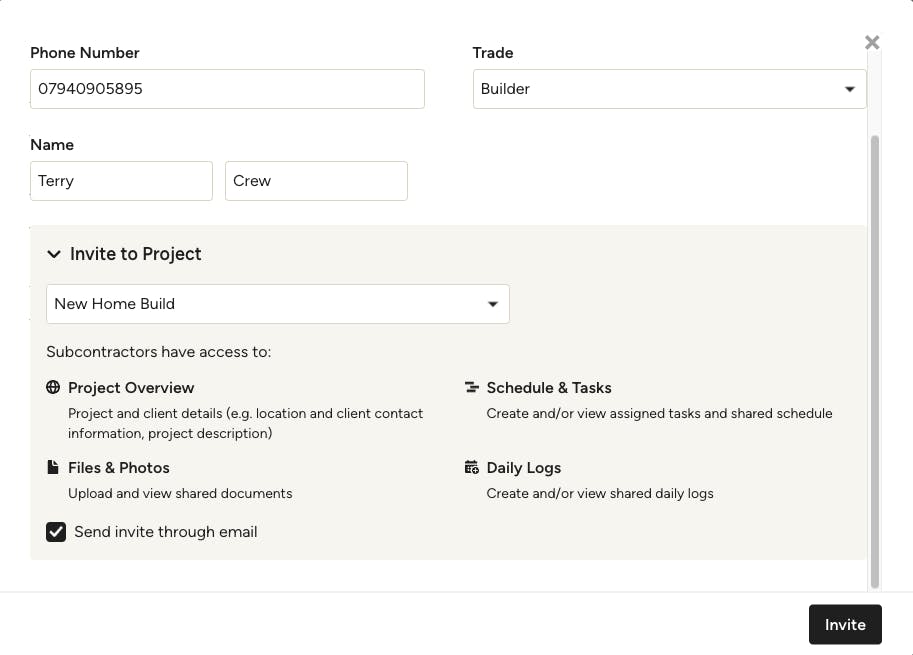
4. If you would like to invite them to a project, click the Invite to Project section. You can then select the relevant project from the dropdown. You will see all the permissions automatically granted to subcontractors, and you will be able to select whether to send an invite through email or not.
5. Click Invite to send. The subcontractor will now be added to your subcontractor list and will also receive an invitation to collaborate on that specific project.
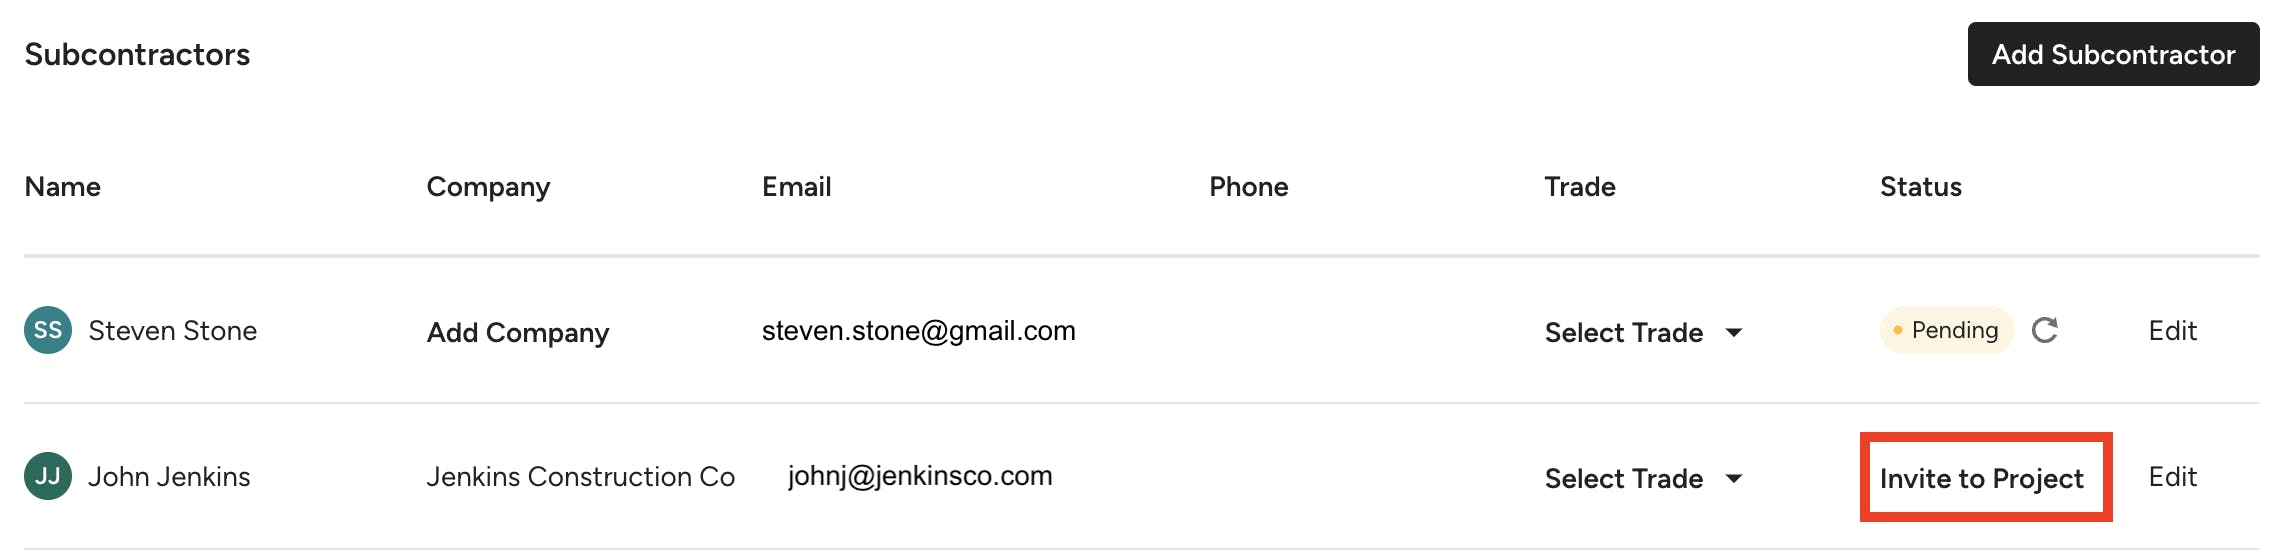
If you don't invite your subcontractor to a specific project, you will notice an Invite to Project option in the Status column of the subcontractor list. Click here to collaborate with them on a project and send an invitation.
If you have already invited them to a specific project, the Status column will either say Pending or Activated.
From a Project
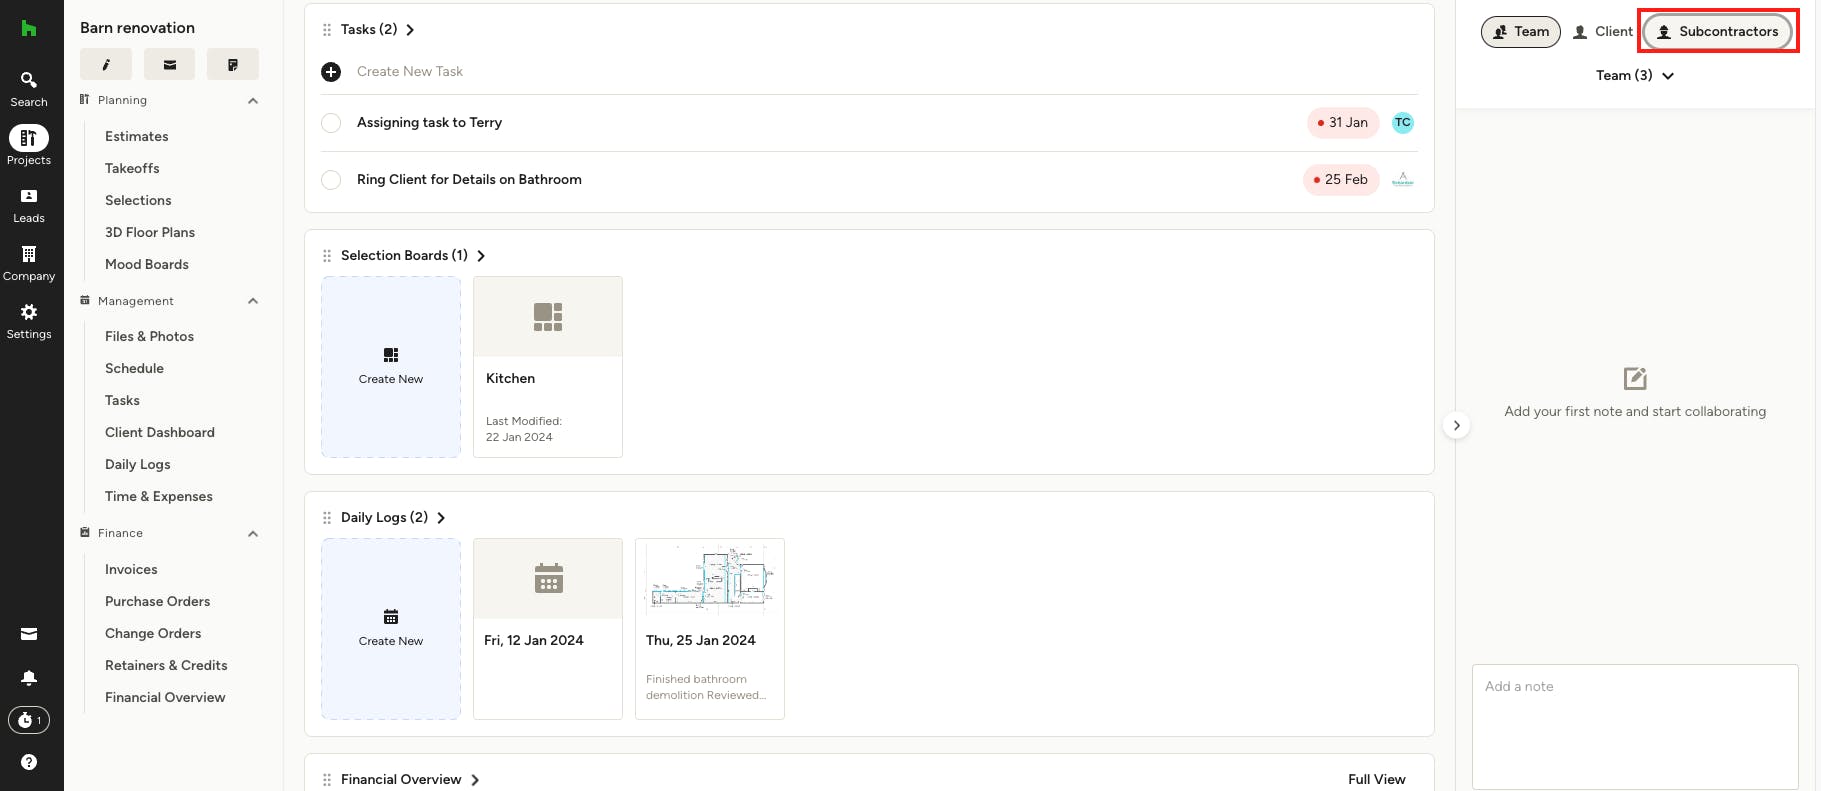
1. If you want to share a specific project with a subcontractor, open up the relevant project from the left navigation. On the right-hand side of your screen, you will see a Subcontractors icon.
2. Click on the Subcontractors icon, and a screen will pop up where you can add a subcontractor to the project. You can either select an existing subcontractor from the dropdown or create a new one with Invite New Subcontractor.
For a new subcontractor, fill out all the contact information. Under Invite to Project, your relevant project should already be selected in the dropdown, but you can adjust if needed. You can also specify whether you would like to send the invite via email or not.
3. Click Invite to send. The subcontractor will now be added to your subcontractor list and will also receive an invitation to collaborate on that specific project.
From Tasks and Schedule
To invite a subcontractor to a specific task or schedule item, open up the relevant schedule and select the item or task you wish to assign them to.
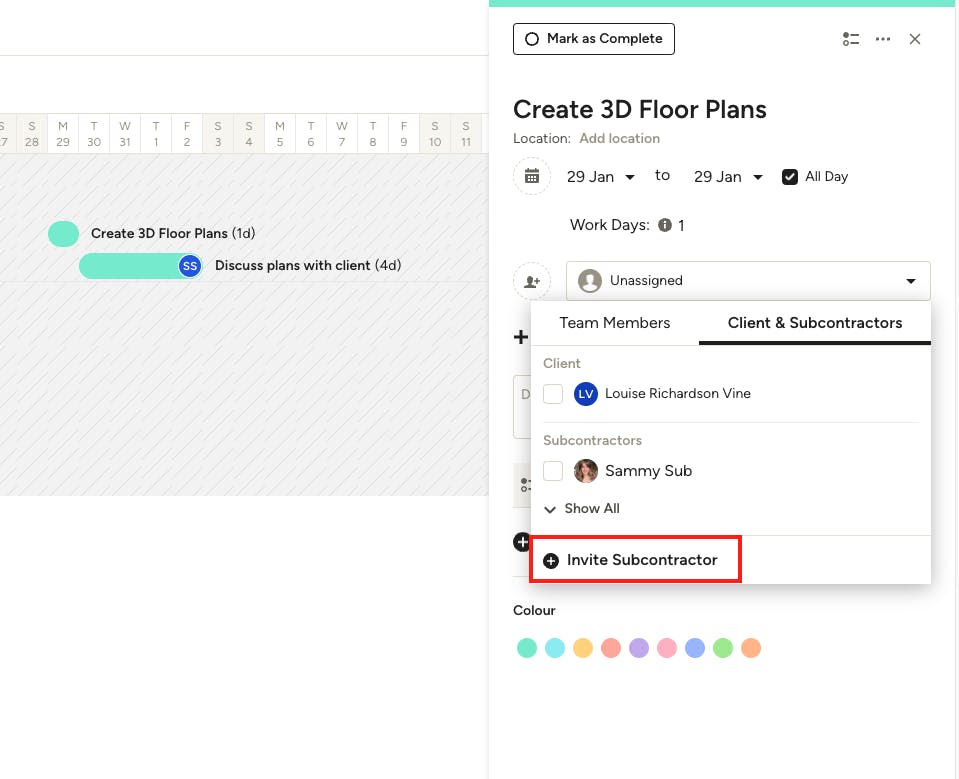
On a Schedule Item: Click the team dropdown and select the Client & Subcontractors tab. From here, you can click Invite Subcontractor and fill in their information to invite them to the project and assign them to the item.
On a Task: Click the team icon and select the Client & Subcontractors tab. From here, you can click Invite Subcontractor and fill in their information to invite them to the project and assign them to the task.
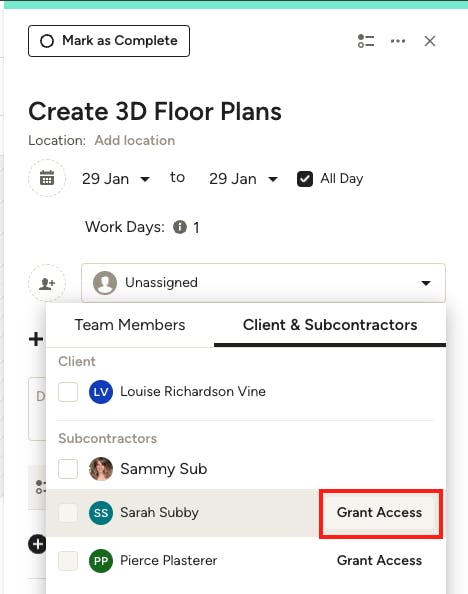
Pro Tip: To quickly give an existing sub access to a project and assign them a schedule item or task in one step, click Grant Access next to their name in the Client & Subcontractors section of the team dropdown.
Edit Subcontractor Information
Once you add a subcontractor, you can easily view and edit information in the subcontractor list.
1. To view, select the Company icon in the left navigation.
2. Select Subcontractors from the left menu. This screen will list all your existing subcontractors, including those who are active or pending. You can add company name information or trade information directly in the list, as well as resend a pending invite if needed. To edit other details, click Edit on the far right.
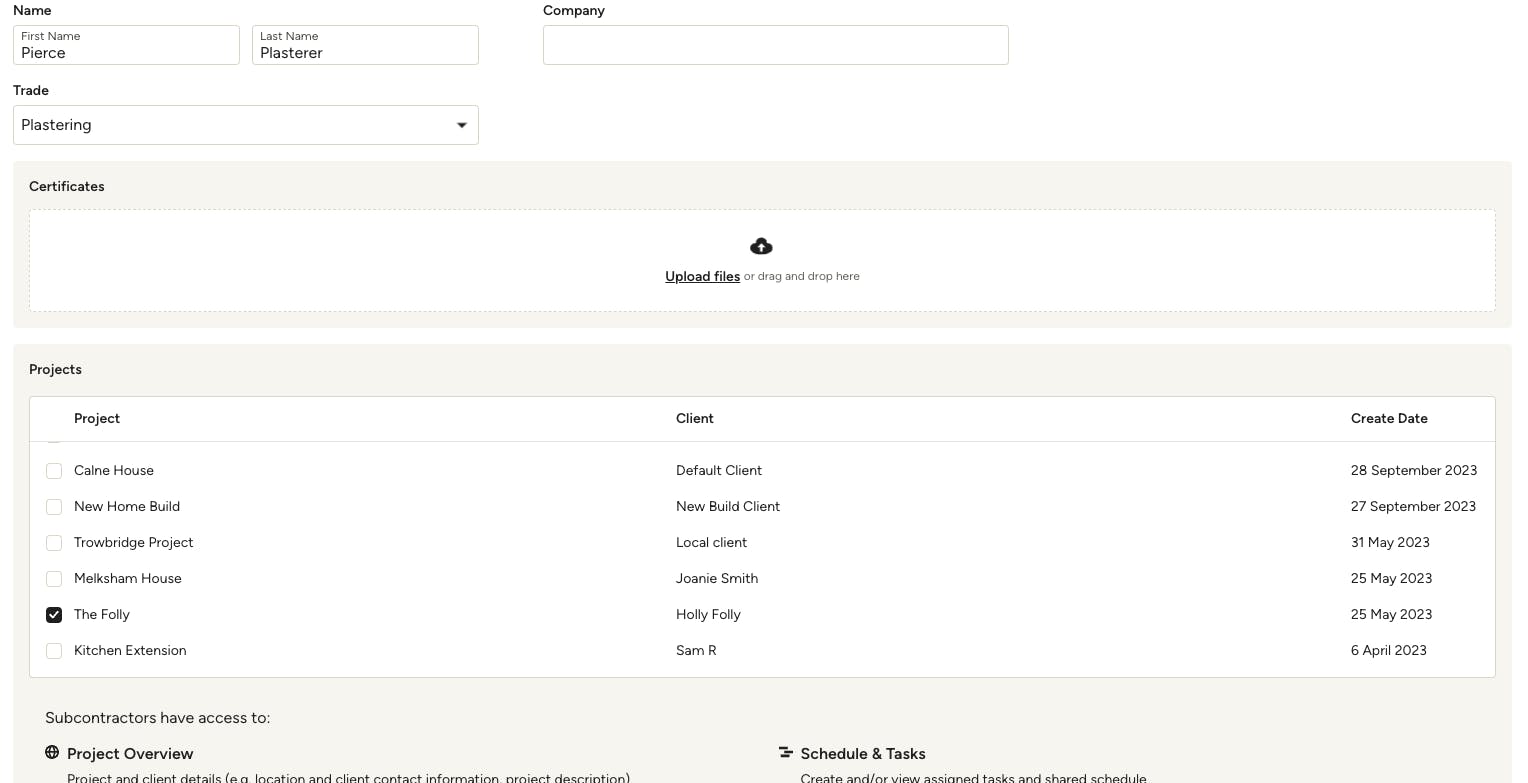
3. Within Edit mode, you will be able to adjust the subcontractor's name, company and trade. You can upload important certificates or insurance documentation so it's always on file. You will also be able to give access or delete access to certain projects by checking the project check box. At the bottom of the edit screen, you can completely remove the subcontractor if needed.

Subcontractor Permissions
Even if you share a project with a subcontractor, they do not automatically have access to files, schedule or daily logs. You will need to manually change share settings for each feature you would like subcontractors to view.
Share Files
To share files, go to your project and select Files and Photos from the left-hand menu. For the file you want to share, click the three dots on the right side, and select Manage Permissions from the menu. Select Access to give subcontractors permissions to view the file. You can also multi-select files by clicking the check boxes to update settings all at once.
Share Daily Logs
To share daily logs, go to your project and select Daily Logs from the left-hand menu. In the Shared With column, click the Team icon — you can then select Access to give subcontractors permissions to view the information for this project.
Share Schedule
To share your schedule, go to your project and select Schedule or from the left-hand menu. Click on the Share icon — you can then select Access to give subcontractors permissions to view the information for this project.

Subcontractor View of Houzz Pro
When you invite a subcontractor to collaborate on a specific project, they will receive an email inviting them to View Project. From here, they can either sign up for a free Houzz account or sign in using their paid Houzz Pro account.
Once they log in, they will be able to view details of the shared project and contribute where needed.
A subcontractor might do work with you and other businesses as well, so they need to be able to switch between teams. They can easily do this in Houzz Pro by clicking the business icon in the bottom left corner, selecting Switch Teams, and then choosing the team they want to open.
Subcontractor FAQ
Here are some common questions about inviting and collaborating with subcontractors.
1. Who counts as a subcontractor?
A subcontractor is an external stakeholder in your project. They aren’t on your team, but they also work on your project and need to stay informed. For example, you could invite an electrician or an interior designer as a subcontractor.
2. Who can invite a subcontractor?
Only the account Admin can invite a subcontractor to join.
3. Does the subcontractor need a Houzz Pro account before I invite them?
Before you invite a subcontractor, they don’t need a Houzz Pro account already, but they will need to create one in order to accept the invitation. Once they receive your invitation, they can easily sign up for Houzz Pro (they can sign up for the free subcontractor version at no cost), and then accept your invitation.
If the subcontractor is already on Houzz Pro, they can just use that account to accept your invitation.
4. Where can I see the status of an invite I sent to a subcontractor?
To see the status of an invitation, go to the Company icon in your left navigation. From there, click Subcontractors in the left menu. This screen will list all your existing subcontractors, including those who are active or pending. If you need to resend an invitation, you can easily do so here.
5. Does adding a subcontractor add them to join just a specific project or all my projects?
Even when you add a subcontractor within your general settings, you will still need to give them access to each individual project. You can give access to specific projects when you edit the subcontractor's information (more details above).
6. Can subcontractors edit anything in the account, or they can only view?
In addition to viewing what you give them access to, subcontractors can create their own daily logs and upload to files, which you can then share with your client, if you choose.
7. Can I set different permissions for different subcontractors?
As of now, all subcontractor permissions must be the same, but the ability to specify permissions per subcontractor is coming soon!
8. Is there a limit to the number of subcontractors I can invite?
There is no limit to the number of subcontractors you can invite.
9. How do I revoke a subcontractor’s access to a specific project but keep them invited to other projects?
To remove a subcontractor from a specific project, go to the Company icon in your left navigation. From there, click Subcontractors in the left menu. Find the relevant subcontractor, and click Edit. In edit mode, scroll down to the Projects section, and uncheck the box to the left of the project you would like to revoke access to. Access to other projects will stay the same unless adjusted.
10. How do I completely remove a subcontractor I previously invited?
To completely remove a subcontractor you previously invited, go to the Company icon in your left navigation. From there, click Subcontractors in the left menu. Find the relevant subcontractor, and click Edit. In edit mode, scroll down to the bottom and select Remove Subcontractor.