how to repair coving/crown molding?
C D
3 years ago

Sponsored
Reload the page to not see this specific ad anymore
Hi all
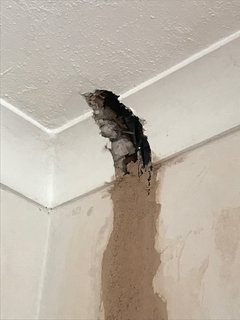
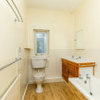
We had central heating installed in our 1930s house few years ago.
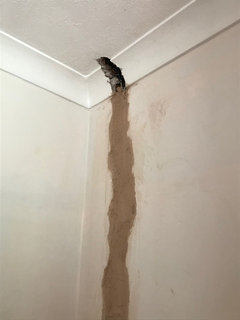
The plumbers who have done it were not the best (a bit cowboys...) and they left a lot of « scars » everywhere in the house where they put the pipes.
It was a bit of a botched job really...
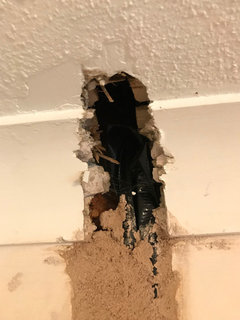
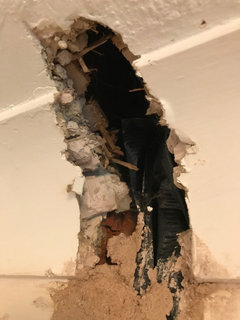
I am attempting to make a temporary redecoration of our dining room (we will redo the kitchen dinner area completely in a few years) and I would like to patch the crown molding that the plumbers left damaged.
See pictures
It doesn’t need to be perfect, just good enough that I can paint to refresh the room.
I am not sure how to tackle this because it is quite large. All the tutorials I have seen online are for small gaps, not that big.
Also, the pipes (very hot) are running just below the surface of the wall (where rough cement has been applied by the plumbers directly on the pipes 🤦♀️)
Any advices?
Many thanks
A plasterer could easily sort that out for you. He will probably use plasterboard, then skim over it including the chasing cement finish, and then finally replace the cornicing where necessary. I don’t think it’s a job for an amateur, I wouldn’t attempt it. Depending where you are a plasterer charges about £170 a day, more in London.
Thanks Sonia
Unfortunately I don’t have the budget to use a plasterer for this job,
I am happy with a DIY job that is not perfect as long as it look “fine”.
I was thinking of using expending foam to fill the hole and then use filler to make it smooth.
However I don’t know if expending foam is a good idea...
Happy to get suggestions on how to tackle this :)
I did a temporary repair like this which worked fine. I found a cheap polystyrene coving of a similar size/shape and cut a piece to fill most of the hole and to form a base for filler. That took a few attempts of trial and error! I then used thin layers of good quality filler(I like Red Devil) along with mesh tape across the gap to hold the filler in place . It took a lot of patience (and probably would be frowned on by a builder) but it did work.
Reload the page to not see this specific ad anymore
Houzz uses cookies and similar technologies to personalise my experience, serve me relevant content, and improve Houzz products and services. By clicking ‘Accept’ I agree to this, as further described in the Houzz Cookie Policy. I can reject non-essential cookies by clicking ‘Manage Preferences’.


C DOriginal Author